

Hi Stampers. No Bones About It – some fabulous Stampin’ Up! products are soon going the way of the dinosaur (retiring)! The new annual catalog goes live on June 1st which means they need to make room for all the amazing new products that are coming. Today’s blog hop will showcase Stampin’ Up! products that you are gonna wanna buy before they are gone. Nobody “wants” to pay those high prices on eBay.
If you follow me at all, you know I’m a huge fan of fancy folds. This “impossible fold” is popping up EVERYWHERE these days. I’m not sure who came up with it, but all of a sudden I’m seeing it everywhere! I decided to use the No Bones About It stamp set to create this adorable dinosaur card.

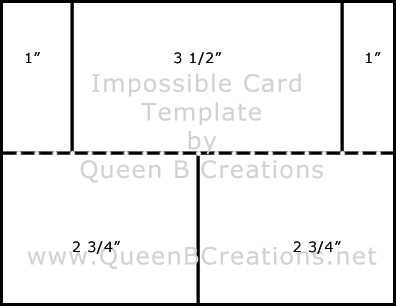
This card is a card stock saver. The Garden Green card base is only 5 1/2″ x 4 1/4″, scored at 2 1/8″ down the long middle. Next, I cut 1″ from each side, up to the fold line on 1/2 of the card. On the other side of the fold, I cut up the middle at 2 3/4″ to the score line. (See the template below.) Then you just twist the card, so one of the one inch strips is in front and one is in back.
I layered Wild Wasabi CS over the top by cutting a rectangle, 4″ x 2 1/2″ and scoring across the short side at 2″. I then cut down, 3/4″ from the edge to the score line. This left me with a sort of L shaped piece of card stock. Then I stamped leaves on each piece with Wild Wasabi and Garden Green ink. For the center (pop up) piece, I cut a layer of Wild Wasabi and one of Very Vanilla CS both cut to 3 1/4″ x 1 3/4″. Leaves were stamped onto the Wild Wasabi piece and the “inside” greeting was stamped on the Very Vanilla piece with Garden Green ink and attached to the card base.

I stamped the dinosaur in Wild Wasabi ink onto a scrap of Very Vanilla CS and then stamped the bones over that in Garden Green ink. The dinosaur was then fussy cut out with the paper snips. When I was going to attach it, I didn’t like the way it looked to be floating in the air, so I cut a strip of Chocolate Chip CS as “ground” to go under it. The “ground” was cut to 3 1/2″ x 1/2″ and has the footprints stamped in Early Espresso ink behind the dinosaur. Then when I attached the dinosaur with mini dimensionals, it looked much better. On the bottom front is a strip that keeps the card stable. This consists of a 5 1/2″ x 1″ strip of Garden Green CS and a 5 1/2″ x 3/4″ strip of Very Vanilla. I stamped the greeting in Wild Wasabi ink and the leaves in Garden Green ink and it’s attached to the card on each side (be sure not to put adhesive in the section that goes over the blank spot. This card will then fit into a medium envelope.
To see more retiring products you can visit my online store in the Last Chance Products section. The nice thing about going directly to the store is that it has photos AND it is continually updated as things sell out. Remember that stamp sets are available until May 25th, but everything else retiring is already “while supplies last” and some things have already sold out!
I hope you love this card and use the template to make one of your own. Be sure to follow along on the blog by using the list below.
Supplies Used:


Amazing card design. I love this stamp set and will be sad to see it go.
This card is SO ADORABLE Lisa Ann!! I love love love it!!!
Love the fold and fab card too!!
Great design and thanks for the instructions! Will have to try that fancy fold.
Great card Lisa. I need to try this, thanks for the instructions too.
Love everything about your card Lisa. TFS