
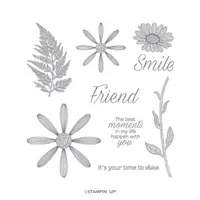
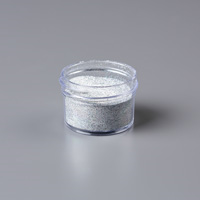
Hi Stampers. I hope you had a fabulous 4th of July weekend. I’m happy to see you back! Today I will be showing how to do the chalkboard technique, using the Daisy Lane stamp set bundle. This is a beautiful technique that I haven’t seen a lot of lately. Stampin’ Up! recently released some amazing Shimmer White Stampin’ Emboss Powder – it sparkles!!
 Instructions:
I started with a Coastal Cabana card base 8-1/2″ x 5-1/2″, scored at 4-1/4″. To do the “chalkboard” technique, I used a 4″ x 5-1/4″ piece of Basic Black CS (rubbed with the embossing buddy to avoid static). I also have a 6″ x 3″ piece of Coastal Cabana CS (also rubbed with the embossing buddy) and a 2″ x 4″ piece of Whisper White CS. Using Versamark ink, I stamped the large daisy twice on the 3″ x 6″ piece of Coastal Cabana. Next, I used the new Shimmer White Stampin’ Emboss Powder to sprinkle over the top of the Versamark. I then tapped off the excess and used my Heat Tool to melt the embossing powder. The small daisies are stamped in Coastal Cabana ink onto the Whisper White 2″ x 4″ strip of Whisper White. They are then punched out with their coordinating punches.

Onto the Basic Black layer I stamped the Friend sentiment in the lower right corner and the smaller daisy twice on the left side of the layer (leaving room for the punched daisies to be placed between them. Again, I used the Versamark ink, Shimmer White Embossing Powder and my heat tool on the daisies and sentiment. Next, using a ruler and my White Stampin’ Chalk Marker, I drew a line around the edge of the card, measuring in approximately 1/4″. I just love using my 12″ clear Tim Holtz design ruler to do this.
The two large daisies are adhered on top of each other using a glue dot (off setting the petals) and the two smaller daisies are adhered on top of each other using a glue dot (off setting the petals). Next, the two were layered onto of each other using mini glue dots. They are then adhered between the two daisies on the Basic Black layer. The flower is finished off by adding a Clear Faceted Gem to the center. Using paper snips I trimmed off the daisy petals that where hanging over the edge of the Basic Black layer. (This is easy to do if you cut from the back side before adhering the layer to the card front). Using snail adhesive, the Basic Black layer is then adhered to the card front.

Decorating the interior of the card:
For the interior of the card, I used a 4″ x 5-1/4″ layer of Whisper White CS. Using Coastal Cabana ink, I stamped the daisy in the upper right and lower left corner of the layer (letting the daisy hang off of the edge) and the sentiment in the center. The inside layer is adhered using snail adhesive.
Product Tip:
Do you use our Whisper White cardstock? If you don’t, you should! After all, the best projects start with the best products, right? Our Whisper White cardstock has an ultrasmooth surface making it ideal for stamping, so you get clean, crisp images. Once you try it, you won’t like using the lesser quality cardstock on your projects any more!
If you live in the United States and would like to shop with me you can follow any of the photo links below to get to my online store. When you place your order, don’t forget to use this months Mystery Hostess code – from the bar on the right – for your chance to be this months hostess and earn FREE hostess rewards!
If you need help with how to use the host code you can find the answer here. If you would like to join me for some classes, clubs or events make sure to visit the events page or sign up for my newsletter so you will never miss out again.
Thank you for visiting please take the time to say hello and leave a comment.
These are the supplies I used:
click on the picture to be taken to my store to purchase


If you enjoyed this post, please be sure to . . .
- Join me on Monday’s at 2:30 PM (MT) on my Facebook page for Facebook LIVE.
- Receive a FREE PDF tutorial when you subscribe to my monthly newsletter (exclusive offers) & daily blog updates here.
- Earn up to a $45 shopping spree with my Royalty Rewards Program.
- Check out the clearance rack and save up to 70%.
- Save 10% on coordinating product bundles!
- The $99 Starter Kit is the best deal of ALL! Discounts & benefits here.
- Visit my gallery for paper crafting ideas.
- Place an order and join my Queen B Creations VIP club for many more FREE PDF Project and Tips.
- Join my Online Classes to create some fabulous projects using Stampin’ Up! products with great layouts, fun folds & techniques you won’t want to miss
- Follow me on Pinterest.
- Subscribe to my YouTube paper crafting video tutorials.


The shimmering white embossing powder makes this card pop! Nice work!
Thank you. I love things that shimmer!