
![]()
Hi Stampers. Welcome to the Stamping Friends Holiday Hop! Can you believe that (in the US) Thanksgiving is next week?!? How did we reach the end of November so quickly?!?!? With all that is going on with COVID, my husband and I have decided to stay home alone. But, that doesn’t mean we can’t have a festive banner to hang.
THANKSGIVING BANNER:

Each pennant of this Thanksgiving banner is made using Cajun Craze CS and then a layer of the GORGEOUS Gilded Autumn Designer Series Paper was placed over that. Each pennant was manually “flagged” the end using the paper snips.

I used the Playful Alphabet Dies to die cut the letters for “Happy Thanksgiving” and the Layering Circle Dies were used to cut the circles.

The letters and circles are alternates of Cajun Craze, Early Espresso and Mint Macaron CS and then mixed and matched.

The larger circles are adhered to the banner pennant using Stampin’ Seal and the second circle is added with stampin’ dimensionals. Since I used Adhesive Sheets on the back of the CS I used for the letters, all I had to do was peel off the backing and adhere the letters as stickers. Easy peasy.

At the top of each pennant, I punched a hole on either side using a 1/4″ circle punch and used the 1/4″ Cinnamon Cider ribbon to string it all up. Overall, I was pretty happy with how it came out, but I think I’m gonna go back and add some die cut leaves to the blank pennants.
I did this banner as a Facebook Live on my Facebook Business Page, it’s now been edited and uploaded to my YouTube Channel. Go subscribe!
Video Tutorial:
CARD:

For my card, I used a 11″ x 4-1/4″ card based scored at 5-1/2″ and then cut 2″ off of the bottom front of the card base and rounded the corners.

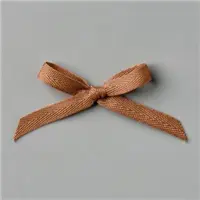
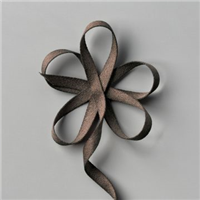
To finish off the top, I added a 4″ x 3-1/4″ layer of Gilded Autumn DSP (I also rounded the corners on this piece) and wrapped a piece of the Early Espresso Suede Trim all the way around. I used a second piece of ribbon (and my bow maker tool) to make the bow and attached that with glue dots.

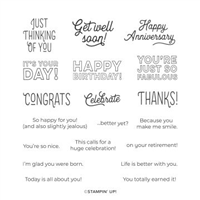
For the sentiment, I stamped the word “thanks” from the Many Mates stamp set in Early Espresso ink onto a scrap of Very Vanilla CS and punched it out using the 1-1/2″ punch. This is then attached it to a piece of Early Espresso CS that had been punched out using the Label Me Lovely Punch using stampin’ dimensionals and the label is attached to the card front (as seen in the photo) using Stampin’ Seal.

Inside the card started with a 4″ x 5-1/4″ layer of Very Vanilla CS with a 4″ x 2-1/4″ piece of DSP added to the bottom. (This is actually the other side of the DSP used on the top of the card. The inside sentiment is also from the Many Mates stamp set and is also stamped in Early Espresso ink. This fold is new to me, I like it! Do you want more holiday inspiration? Pop on over to Germany to see Katja’s post HERE. If you should ever get lost, I’ve provided the line up for you below.
Blog Hop Line Up:
- Steph Jandrow (US)
- Tiziana Milano (US)
- Lisa Ann Bernard – Queen B Creations (US)
- Katja Ettig (GER)
- Teri Pocock
- Sue Vine – MissPinksCraftSpot (Australia)
- Jean Bolen Beaulieu
- Kim Lamos
- Heidi Collins (US)
- Kim Quade (US)
- Maureen Rauchfuss (US)
- Barbara Welch (US)
- Anne Marie Hile (US)
- Melissa Thomas (US)
If you live in the United States and would like to shop with me you can follow any of the photo links below to get to my online store. When you place your order, don’t forget to use this months Mystery Hostess code – from the bar on the right – to earn this months Customer Appreciation PDF Tutorial (with a qualifying order)! If you need help with how to use the host code you can find the answer here.
If you would like to join me for some classes, clubs or events make sure to visit the events page or sign up for my newsletter so you will never miss out again.
Thank you for visiting please take the time to say hello and leave a comment.
These are the supplies I used:
click on the picture to be taken to my store to purchase


Awesome Deals!
Join My Team – Creative Royalty
Click HERE to learn more and start choosing your kit products! No Risk! Try out all of the demonstrator discounts and benefits through March 31, 2021. No penalty to drop. Extend from April through June (and you can order from the new 2021 Annual Catalog early) by reaching $300 in sales by March 31, 2021. Just for You! There’s no obligation to host parties, sell or purchase anything other than the kit. It’s the perfect crafty gift to yourself!
Earn my monthly Customer Appreciation PDF Tutorial by placing an order $30 or more (before shipping & tax). This PDF tutorial includes all the instructions to create six adorable cards! All orders of $30 and above (before tax and shipping) placed in my online store using the Hostess Code DR32NCPN, will be emailed the Customer Appreciation PDF tutorial.
PLEASE NOTE, if your order is over $150 before tax and shipping DO NOT enter the Hostess Code and you will receive all the Stampin’ Rewards you earned on your order AND the Customer Appreciation PDF tutorial.
If you enjoyed this post, please be sure to . . .
- Join me on Monday’s at 2:30 PM (MT) on my Facebook page for Facebook LIVE.
- Receive a FREE PDF tutorial when you subscribe to my monthly newsletter (exclusive offers) & daily blog updates here.
- Earn up to a $45 shopping spree with my Royalty Rewards Program.
- Check out the clearance rack and save up to 70%.
- Save 10% on coordinating product bundles!
- The $99 Starter Kit is the best deal of ALL! Discounts & benefits here.
- Visit my gallery for paper crafting ideas.
- Place a $30 (or more) order and receive my FREE Customer Appreciation PDF Tutorial.
- Join my Online Classes to create some fabulous projects using Stampin’ Up! products with great layouts, fun folds & techniques you won’t want to miss
- Follow me on Pinterest.
- Subscribe to my YouTube paper crafting video tutorials.


Love the banner! It reminded me that I made a Christmas one last year. I wonder if I can find it!! Beautiful card too.
Thanks. Hope you find your Christmas banner… LOL
Great projects – that banner is simply amazing – thank you so much for sharing. If I start now I might have one done for next year 🙂
Thanks. The banner really wasn’t very hard. Give it a go!
Love the Gilded Autumn DSP! Your banner showcased it beautifully.
Yes, it does. Thank you!
Wow, that banner looks amazing! Beautiful projects Lisa
Thanks, Sue.
Fabulous projects, Lisa! Wow! That banner is amazing and so perfect to showcase that gorgeous DSP. I hope you and your family have a very Happy Thanksgiving!
Thank you. Happy Thanksgiving to you, too!
Oh, I love banners and this one is cute and a long one. I love your card too. Simple but cute card layout. Thanks for sharing.
Thanks, Kim.
Amazing pennant! I admire you for the patience you have to create it! Super fun!
Thank you so much, Kim!
I agree with Kim on this one…amazing banner and lots of patience!
Thank you. *blush*